Abatement Technologies PAK50 | Our#: 177961
Abatement Technologies PAK50 Yearly Kit
Abatement Technologies PAK50 | Our#: 177961
- Free Shipping & Free Returns
- 100% Compatibility Guarantee
Abatement Technologies PAK50 Yearly Kit
- Change Every 6 Months
- Original Manufacturer Part
- Free Shipping & Free Returns
- 100% Compatibility Guarantee
Frequently Purchased Together
Product Details
Abatement Technologies PAK50 Filter Yearly Kit
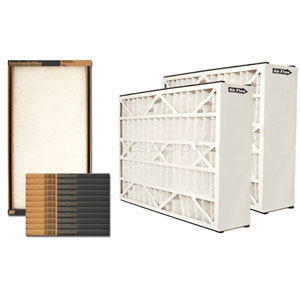
Maintain your Abatement Technologies CAP50-U purification system with this complete yearly maintenance kit. The PAK50 kit includes the following components:
INCLUDES:
QTY 2 - H055 MERV 11 Final Filter - 16x25x5 - change bi-annually
QTY 12 - H051 Fiberglass Disposable Filters - 16x25x1 - change monthly
The CAP50 Series Air Purifiers from Abatement Technologies can help improve indoor air quality by capturing many of the pollutants that can trigger allergic reactions. CAP50 Series Central Air Cleaners are designed to capture up to 97% of the airborne dirt particles, mold and fungal spores, pollens and other particulates flowing through your central HVAC system that low-efficiency 1-inch HVAC filters miss.
How to change your furnace/air-conditioner/HVAC air filter
Estimated time: 10 minutes or less
Steps
Determine the location of your filter
Your forced air system will be similar, whether or not it is a heating (furnace) or cooling (AC) system – or both. The furnace filter housing/slot is located right next to the heating/cooling system’s air handler or blower. Your filter(s) may also be located in a return grille on the wall or ceiling of your home.
Determine the type/size of filter that you use
Typically, the dimensions or part number of the filter will be printed on the filter frame. Use this information to order a new filter.
Purchase a new air filter from DiscountFilters.com
Visit DiscountFilters.com and purchase a new filter. Use our filter finders to verify the correct match.
Remove the old filter
Turn off the power to the heating/cooling system and remove the old filter from its housing/slot and discard.
Insert the new filter
Pay attention to any airflow direction arrows printed on the frame of the new filter. Install the filter by sliding it into the filter housing/slot with the airflow arrow pointing towards the blower. If installing the filter in a wall or ceiling grille – the airflow arrow should point towards the wall or ceiling. Turn on the power to the forced air system.
Enjoy cleaner air!


